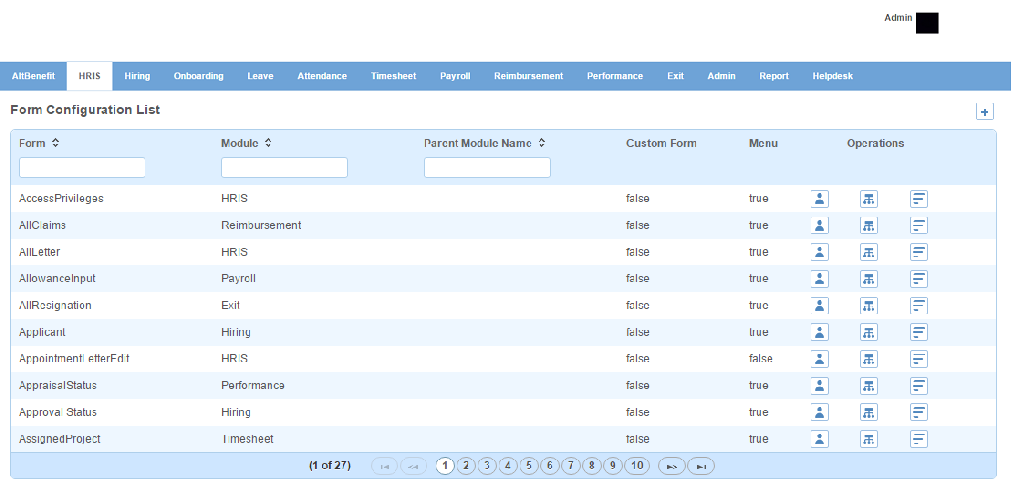
Form Configuration page displays the list of Form Configurations. You can filter the list on the basis of form, module and parent module name.
How to create a custom form?
1. Click + icon. Following list of custom forms will open.

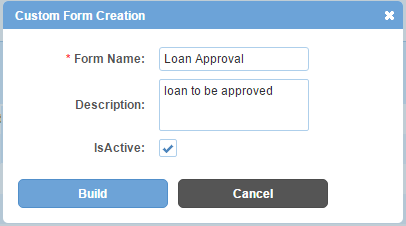
2. Click Create New Form button on the top right. Following pop up window will open.
Field Level Description
| Form Name | name of custom form. |
| Description | description of custom form. |
| IsActive | can be either checked or unchecked. Indicates whether the role is visible or not in Alt Worklife. |
3. Enter form name.
4. Check is active check box to make the form active or visible in Alt Worklife.
5. Click Build button. Custom form creation page will open.

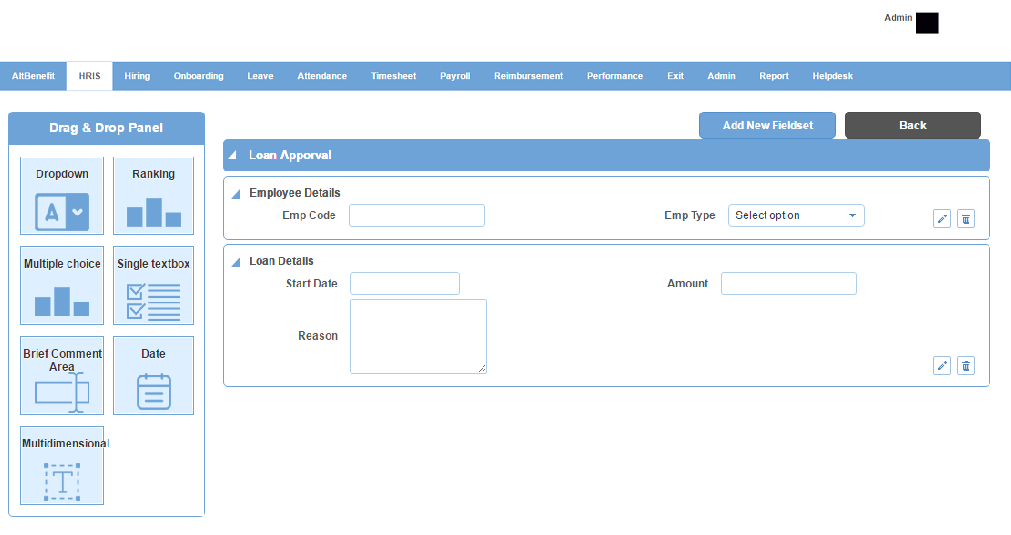
6. Click Add New Fieldset button.
7. Enter fieldset name. Fieldset name will be displayed as section heading in Alt Worklife on top of the fields configured under the fieldset name. Following page will be displayed.
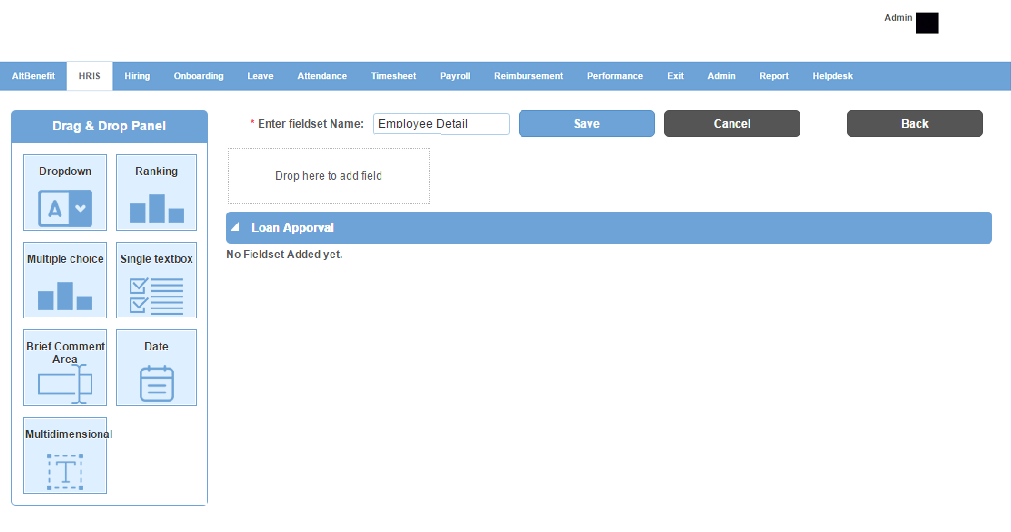
8. Drag and drop form elements/fields from the following section which is on the left side of the page to Drop Here To Add Fields section on the right, under Fieldset Name textbox.
9. For Single textbox, Brief Comment Area, Date and Multidimensional, enter Field Label. Go to step 14.
10. For Drop down and Multiple choice, enter Field Label.
11. Enter value and click + icon.
12. Repeat step 11 for another value.
Note: Both drop down and multiple choice should have more than one value.
13. For Multiple choice, check Allow multiple choice selection check box to choose one or more values from the values added.
14. Click Add Field button.
15. Click Save button. Following page will be displayed.

16. Click Add New Fieldset button to add another field set and repeat steps 7 to 15. Following will be displayed.
How to integrate a custom form with a menu item?
1. On the custom forms list page, click  (Integrate Form) icon. Following pop up window will open.

2. Select a parent menu.
3. Click Integrate button. The custom form will be integrated with the menu item and added to all forms list.
How to set organization level configuration for a form?
1. On the Form Configurations list page, click  icon. Following page will open with forms or sections of forms having a set of fields.
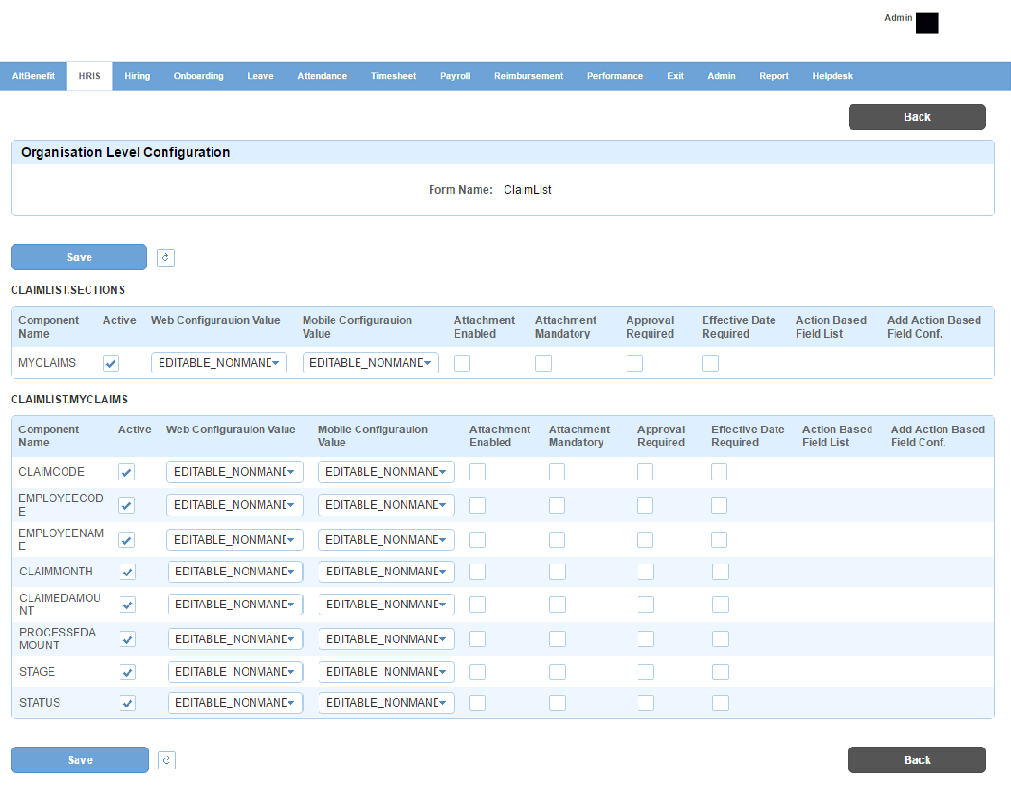
Within a form or section of form, for a Component Name (field):
2. Check Active check box to make the field active or visible in Alt Worklife.
3. Select one of the following options from Web Configuration Value (for web portal):
DENY - To make the field non viewable
VIEWABLE - To make the field only viewable (non editable)
EDITABLE_NONMANDATORY - To make the field editable but non mandatory
EDITABLE_MANDATORY - To make the field editable and mandatory
4. Select one of the options from Mobile Configuration Value (for mobile app). The options are similar to Web Configuration Value drop down options.
5. Check Attachment Enabled check box to enable attaching a document for the field.
6. Check Attachment Mandatory check box to make attaching a document mandatory for the field.
7. Check Approval Required check box to make manger's approval mandatory for the field.
8. Check Effective Date Required check box to make effective date mandatory for the field.
9. Click Save button.
How to set context level configuration for a form?
1. On the Form Configurations list page, click  icon under Context Level. Following page will open.
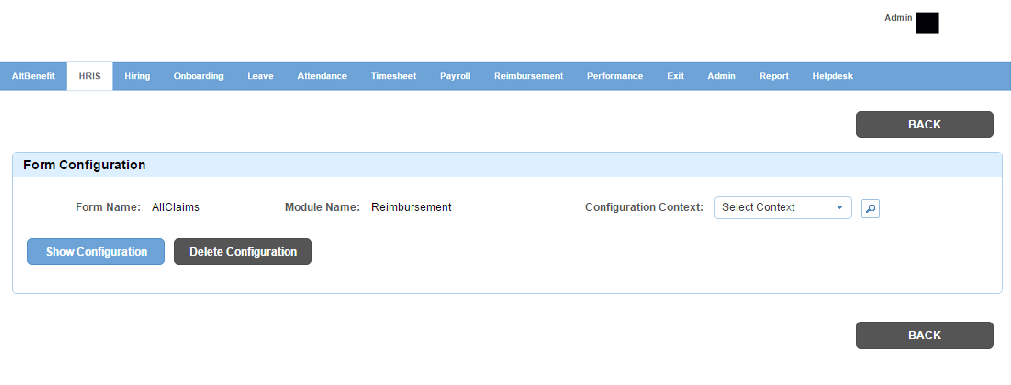
2. Select one of the following options from Configuration Context drop down:
FORM_ROLE
FORM_STAGE
FORM_ROLE_STAGE
Note: FORM_STAGE and FORM_ROLE_STAGE options will not be applicable for custom forms.
3. Click Search(lens) icon.
4. For FORM_ROLE, Roles drop down will be displayed. Select role from Roles drop down. Go to step 8.
5. For FORM_STAGE, Stages drop down will be displayed. Select stage from Stages drop down. For example, you chose NewLeave form, then Leave workflow will get linked and display all the stages of Leave workflow will be displayed in the drop down. Go to step 8.
6. For FORM_ROLE_STAGE, Roles and Stages drop down will be displayed. Select stages from Stages drop down. For example, you chose AllClaims form, then Reimbursements workflow will get linked and all the stages of Reimbursements workflow will be displayed in the drop down.
7. Select roles from Roles drop down. All the roles linked to the selected Stage will be displayed in the drop down. For example, you chose stage L1 Approval, then roles linked to it, L1 Manager will be displayed in the drop down.
8. Click Show Configuration button. Following will be displayed.

9. Repeat steps 2 to 9 of How to set organization level configuration for a form?
Click Reset icon to reset all the form values.
Click Reselect Credential button to reselect the Role or Stage or both.
Impact in Alt Worklife
Let us consider an example of a custom form Loan Approval. It has been integrated to HRIS module. It has been assigned role menu permission for Employee role. See Role Menu Permission for more details.
Loan Approval form's all the fields have been set as EDITABLE_NONMANDATORY for Employee role under Context Level configuration.
Now when an employee logs in he will be able to view menu item Loan Approval under HRIS. When he clicks on Loan Approval, he will be able to view all the fields of the form as editable.
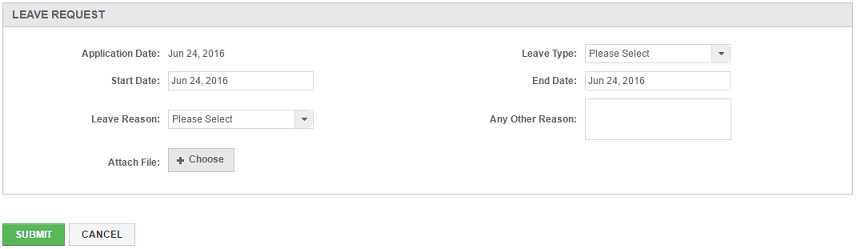
Let us consider another example of NewLeave form. You have set the Context Level configuration for Employee role of the following sections:

Now when an employee logs in the web portal and goes to Leave > New Leave to apply for a new leave following form will be displayed: